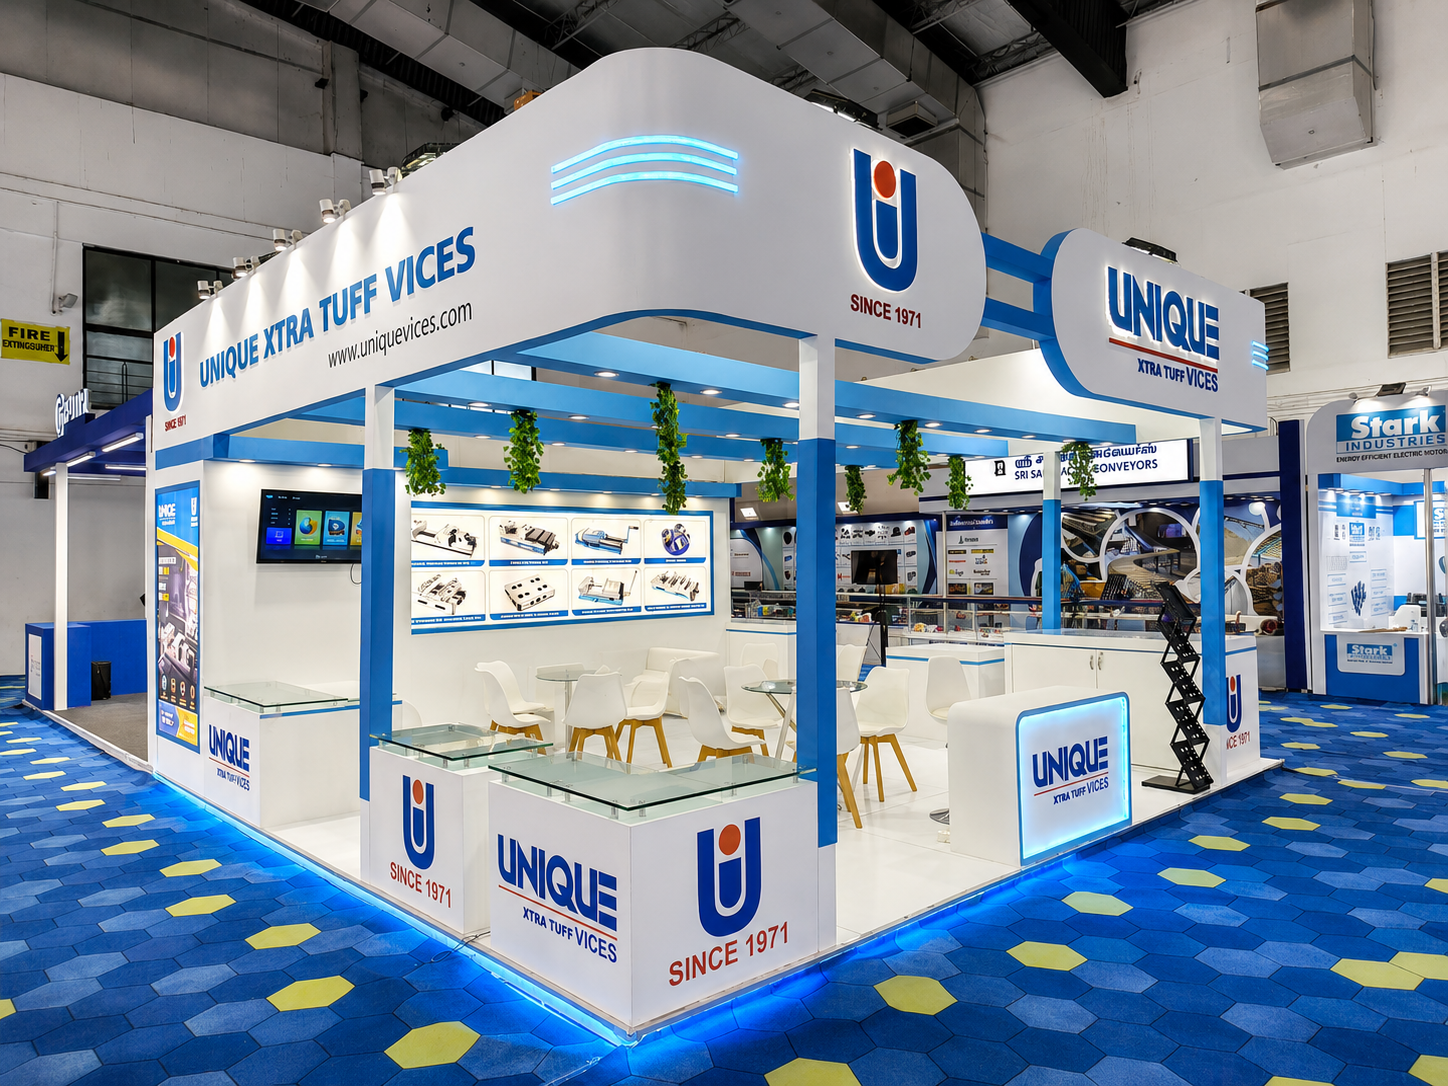
A successful real estate exhibition stall should help a visitor understand three things within a few seconds: who the developer is, where the project is located and what action the visitor should take next.
*Price and availability are accurate at the time of publishing. Verified by Property Specialists.
At a property expo, an attractive structure alone is not enough. The stall must also explain the project, qualify visitors, support private conversations and make it easy to book a site visit. This requires a different approach from a general corporate exhibition booth.
The most effective property exhibition stalls are therefore planned as physical sales journeys. Every graphic, screen, counter and meeting area should help move a visitor from initial curiosity to a meaningful next step.
Why Real Estate Exhibition Stalls Need a Different Strategy
Property purchases involve a longer decision cycle than most products displayed at trade shows. Visitors may need to understand:
The developer’s credibility
The project location
Connectivity and nearby infrastructure
Apartment or plot configurations
Floor plans
Amenities
Construction or possession status
Pricing and payment options
Regulatory information
Site-visit arrangements
Trying to place all this information on a single back wall usually creates visual clutter. Visitors see many messages but remember very little.
A better approach is to organise the stall around the questions a serious buyer asks in sequence.
Design the Stall Around the Property Buyer’s Journey
A real estate expo booth can be divided into five functional zones.
Zone
Purpose
Recommended elements
Attraction zone
Stop relevant visitors
Project name, location, developer identity and one clear value proposition
Discovery zone
Explain the opportunity
Master plan, location map, model, floor plans and project film
Qualification zone
Identify serious prospects
Reception counter, short lead form and visitor-interest questions
Consultation zone
Support detailed discussions
Seating, brochures, pricing sheets and sales presentation screens
Conversion zone
Secure the next action
Site-visit booking, meeting appointment, QR code or callback request
The zones do not need physical walls between them. They can be created through flooring, furniture, lighting, counters and the direction in which visitors move.
The important point is that visitors should not have to search for the next step.
Create a Three-Second Message for the Front of the Stall
The front elevation should communicate one primary message. It should not attempt to explain the entire development.
A practical message hierarchy is:
Developer or project name
Project location
Property category
One verified differentiator
A simple action
For example:
Premium residential plots in Greater Noida Explore the master plan and book a site visit
This is easier to understand than a wall containing multiple slogans, amenities, phone numbers, awards and floor-plan details.
Pricing, possession dates and regulatory claims should only be displayed when they are current and approved by the developer’s authorised team.
Make the Location Story Easy to Understand
Location is often the most important part of a property presentation. However, many exhibition stalls use complicated maps that require a salesperson to explain every road and landmark.
A more useful location display should show:
The project site
Major approach roads
Metro or railway connectivity where relevant
Employment centres
Schools and hospitals
Airports or transport corridors
Approximate travel relationships
Existing and proposed infrastructure clearly differentiated
Proposed infrastructure should never be presented as completed infrastructure. Clear labels such as “operational,” “under construction” and “proposed” help visitors understand the information and strengthen trust.
When possible, combine a simplified wall map with an interactive screen. The wall map gives an immediate overview, while the screen allows the sales team to provide more detailed explanations.
Use the Project Model as a Sales Tool
A physical model can attract visitors, but it should not become a decorative object placed in the middle of the stall.
Before approving its position, consider:
Whether visitors can view it from more than one side
Whether the sales team can stand beside it without blocking circulation
Whether tower, plot and amenity labels are readable
Whether lighting creates glare
Whether the model requires a protective barrier
Whether the transport and installation plan is practical
Whether the model location interferes with the reception or meeting area
For large developments, a model works best when supported by a screen showing floor plans, unit views, amenity details and project phases.
For compact booths, a digital master plan may be more practical than a large physical model.
Choose the Right Booth Format
The correct exhibition stall format depends on the booth size, project stage and sales objective.
Compact Booth
A compact booth should prioritise:
Strong front branding
One consultation table
A vertical screen
A concealed storage unit
Digital brochures
A simple lead-capture point
Large models and excessive furniture can make a small booth uncomfortable.
Modular Booth
A modular structure is useful for developers participating in several exhibitions. Graphics and project-specific panels can be replaced while the main structure is reused.
This approach is suitable when consistency, faster setup and controlled costs are important.
Custom-Built Booth
A custom exhibition stall provides greater control over:
Architectural form
Private meeting rooms
Model-display areas
Large-format LED content
Premium finishes
Hospitality zones
Multiple project presentations
Visitor circulation
It is most appropriate when the exhibition is strategically important or when a developer needs to present several projects under one brand.
Coordinate Design and Execution Through One Workflow
An exhibition concept must remain practical after it moves from a 3D presentation into fabrication and installation.
Before production begins, the team should confirm:
Final booth dimensions
Open sides
Permitted construction height
Electrical requirements
Screen and equipment loads
Graphic sizes
Furniture quantities
Storage requirements
Fire-safety requirements
Installation and dismantling schedules
Loading and unloading access
Venue approval deadlines
Developers that prefer a single accountable workflow from concept through on-site handover can work with an experienced partner such as Stall Designs, rather than coordinating separate design, fabrication and installation vendors.
The objective is not only to produce an attractive structure. It is to ensure that approved graphics, lighting, screens, models, furniture and sales materials are ready when the organiser hands over the stall.
Plan for Noida and Greater Noida Exhibition Conditions
Property exhibitions in Delhi NCR can attract a mixture of investors, end users, channel partners and local business owners. The booth should therefore support both quick enquiries and longer consultations.
For exhibitions in Noida or Greater Noida, plan for:
Visitors arriving in groups or with family members
High interest in location and infrastructure maps
Requests for project comparisons
Private discussions about pricing and payment plans
A booth designed only for photographs may struggle during peak visitor hours. Circulation, seating and storage become especially important when several sales representatives are working simultaneously.
Build a Better Lead-Qualification Process
Collecting the maximum number of phone numbers should not be the only goal.
The lead form should help the sales team identify:
Preferred property type
Budget range
Purchase purpose
Preferred configuration
Expected buying timeline
Current city
Site-visit interest
Preferred contact method
Consent to receive follow-up communication
Keep the initial form short. Detailed qualification can happen during the conversation or in the follow-up process.
Use separate lead identifiers for:
Walk-in enquiries
Pre-registered visitors
Channel partners
Existing customers
Investors
Site-visit bookings
High-intent consultations
This makes post-event reporting more useful than a single spreadsheet containing unclassified contact details.
Give Sales Teams the Right Tools
The booth and the sales process should be planned together.
Before the exhibition, provide the team with:
A concise project introduction
Approved answers to common questions
Current price and availability information
A clear explanation of project phases
Qualification questions
Site-visit booking instructions
Escalation contacts
Lead-entry procedures
A defined follow-up timeline
Screens should also be prepared for the way the team will actually use them. A long promotional film may be useful for general viewing, while a separate interactive presentation is better for one-to-one consultations.
Measure More Than Footfall
Footfall is useful, but it does not reveal whether the event produced business value.
Track:
Total visitors engaged
Qualified enquiries
Consultation meetings
Brochures or digital assets requested
Site visits booked
Channel-partner registrations
Follow-up appointments
Opportunities created
Sales resulting from exhibition leads
A simple starting calculation is:
Cost per qualified lead = Total exhibition expenditure ÷ Number of qualified leads
The total expenditure should include the space, stall design, fabrication, graphics, travel, staffing, hospitality and promotional material—not only the booth-construction cost.
Developers can also compare different exhibitions by measuring the percentage of qualified leads that progress to site visits and sales discussions.
Protect Trust at Every Stage
Real estate is a high-consideration category. Visitors may act on the information displayed at the booth, so every factual claim should be reviewed.
Before printing graphics or uploading screen content, verify:
Project name and developer entity
Location description
Regulatory information
Project status
Available configurations
Price communication
Possession statements
Amenity details
Infrastructure status
Offer terms
Contact information
Avoid vague superlatives such as “best investment,” “guaranteed return” or “number one project” unless the statement can be substantiated and is legally approved.
Clear, accurate information is more persuasive than exaggerated language.
Pre-Show Checklist for Property Developers
Before approving the final stall, ask the following questions:
Can visitors identify the developer, project and location from the aisle?
Is there one clear reason to enter the stall?
Can the project be explained without blocking the reception area?
Is the location map easy to understand?
Is the model or digital master plan visible?
Is there enough seating for serious buyers?
Is private information protected during consultations?
Is there concealed storage?
Are all project claims verified?
Does every QR code have a specific purpose?
Can the team classify leads immediately?
Has the installation plan been approved?
Are electrical and screen requirements documented?
Is there a fallback plan for technical failure?
Has the follow-up process been assigned before the show begins?
What should a real estate exhibition stall display first?
The front of the stall should display the developer or project name, project location, property category and one clear reason for visitors to enter. Detailed floor plans and pricing information should be placed inside the booth.
Is a physical project model necessary?
Not always. A model is valuable for large developments and master-planned projects, but a well-designed digital master plan may be more practical for compact stalls or projects with changing phases.
How can a property expo booth generate better-quality leads?
Use a short qualification process that records property preference, budget, buying timeline, purchase purpose and site-visit interest. Classify leads during the event instead of treating every visitor as equally ready to buy.
Should a property developer choose a modular or custom stall?
A modular stall is suitable for repeated exhibitions and faster adaptation. A custom stall is better when the developer requires premium architecture, private meeting spaces, large models or multiple project presentations.
How many calls to action should an exhibition stall have?
The stall can support several visitor needs, but each area should have one clear next action. Examples include requesting a brochure, speaking to an adviser or booking a site visit.
What information should be verified before the event?
Verify project status, configurations, location claims, regulatory details, pricing, possession information, infrastructure references, offers and contact details before producing any graphics or digital presentations.
Conclusion
A real estate exhibition stall should do more than attract attention. It should make a complex property decision easier to understand.
The strongest booths organise information around the buyer’s journey, provide clear location and project explanations, support productive consultations and connect every enquiry with a measurable follow-up action.
When design, fabrication, technology, content and sales operations are planned as one system, the exhibition stall becomes more than a temporary display. It becomes a focused environment for building trust, qualifying prospects and creating the next meaningful conversation.

 By stalldesigns